Fitting curtain tracks
Fitting curtain tracks is simple enough as long as you know what type of wall you are trying to fix into. My guides – ‘Fixing into masonry walls‘ and ‘Fixing into hollow walls‘ will provide you with all the information you need on these different surface types. The other important factor is whether to fix the track directly to the wall or on a batten as shown in the example below. The advantage of fitting curtain tracks on batten is that it is much easier to drill and fix accurately onto a batten, rather than onto a wall which may contain concrete lintels above the window, or, the wall surface may be uneven and therefore again cause problems of accuracy. With a batten, you can find good fixing points, attach the batten securely and then crack on with fitting the curtain track accurately on the batten.
There are no hard and fast rules as to what height above a window to fix a track but you are often guided by finding a mid point between the top of the window reveal and the ceiling or coving above. Your decision may also be governed by the length of the curtains. Always remember to use a cable, pipe, and stud detector to help find safe fixing positions for fixing your curtain tracks.
 |
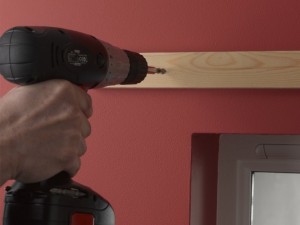
| 1. The batten should be about 30cm wider than the window, to extend 15cm either side. Position the batten with a spirit level and mark a guideline on the wall surface. Keeping an eye on the batten, drill holes through the batten into the wall surface below. Use the correct drill bit for the wall surface. |
| Â |
 |
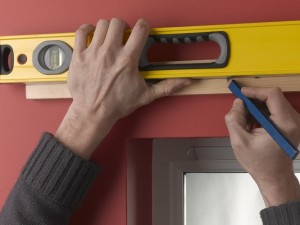
2. Use the appropriate wall plugs and screws to secure the batten to the wall following your guideline precisely. In most circumstances, the screws you use should be 3 times the depth of the batten. There’s some more good information on batten fixing in my guide ‘Fitting batten shelving’. |
 |
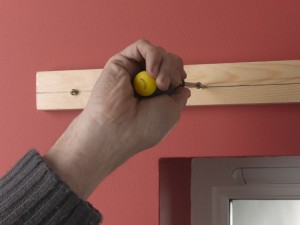
3. With a spirit level, measure and draw a horizontal line through the centre of the batten. Go along the whole length. This line will be your guide for fitting the track. |
 |
4. When fitting a curtain track with multiple brackets, space the screws at regular intervals along the length of the batten. |
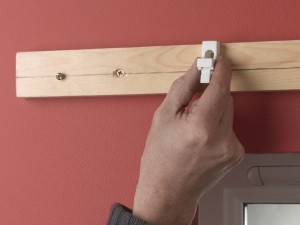 |
5. Slot the holding brackets onto the screws following the manufacturer’s guidelines. You may need to adjust the screw depth for a secure fitting. |
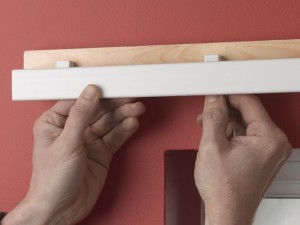 |
6. With all the holding brackets in place, the track can be fitted neatly to the brackets and tightened in position with the screws or clips provided. |
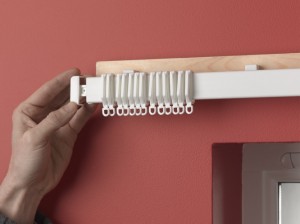 |
7. Slide the gliders provided onto the track. To stop them from sliding off, fix the end supports in place, securing with the screws or clips provided. |
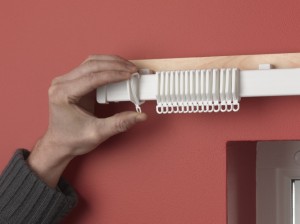 |
8. Ensure that you have enough gliders to support the curtains. Most systems allow you to clip on more gliders without having to remove the end supports. |
Curtain track tips
- Manufacturers will have slightly differing systems for gliders, clips and tracks, so always pay close attention to any subtle differences.
- The distance you allow your batten/track to extend past the window reveals will be dependent on the weight of your curtains and the width of the window. You want to let as much light into the room as possible when the curtains are drawn back, so you may need more or less than the 15cm either side that I have shown in the example above.
- If you need to trim down the length of the track, simply measure your requirement and cut the track with a fine toothed saw. A junior hacksaw is ideal for this.
- The batten can be painted for a better decorative effect. remember to fill any visible fixing holes.
- When fixing into a wall surface it’s almost inevitable that you’re going to need a drill. I provide plenty of advice on the best DIY drill on the market in my guide – ‘Buying a cordless drill’.

Looks good, bookmarked this guide, thanks!
How thick and how wide should the batten be? And what’s it sold as in the shops? Is it ‘planed stripwood’?
Hi Matt,
Glad to help.
Normally the batten should be around the 50mm x 25mm (2in x 1in) mark.
It may be sold as planed stripwood, or PSE (planed square edge), although some outlets will have other names.
Best,
Julian
This was very useful but it was amusing to see that the batten split along the width when you fixed it to the wall.
Hi John,
That’s actually not a split, it’s a pencil line – but I can see why you thought it was!
Best
Julian