Where to start wallpapering
Where to start wallpapering in a room can often cause a touch of anxiety, but basically you just need to follow a few simple rules. A decision on the best starting point is often dependent on the size and type of pattern in your chosen wallpaper. Basically any large pattern may well require centralizing the main motif on the most prominent wall in the room, which is normally one containing a chimney breast. With a very small pattern, centralizing the wallpaper design is not normally required. Below are two of the most common room shapes, showing the main principles I apply when deciding where to start wallpapering.
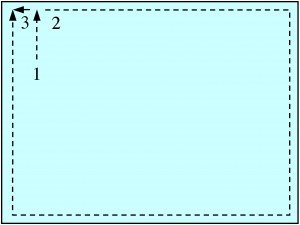
 Bird’s eye view of simple room. |
In a simple square or rectangular room with a small-patterned paper, always look to begin close to a corner, whilst never using the corner itself as a true vertical guideline.
|
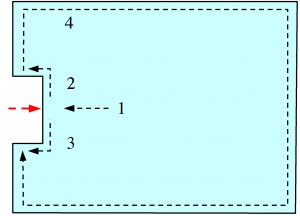
 Bird’s eye view of room with chimney breast. |
In a room with a chimney breast, you can treat it much the same as a ‘square’ room if your pattern doesn’t require centralizing. For a large pattern that requires centralizing, I’d begin as shown here.
|
Other wallpapering starting points
- Joining in an internal corner is normally the best option as your eye doesn’t pick up the inevitable pattern discrepancy in a corner as it would if the join was in the middle of a wall.
- Choose your ‘joining corner’ according to whether it is the most inconspicuous in the room. For example the internal corner next to a chimney breast is ideal. In a ‘square’ room, the corner that is behind where the door opens is always a good option.
- Both above examples necessitate having a join between where the wallpaper starts and finishes. If no such join is necessary, in a room that has a floor to ceiling bookcase for example, then you are best off starting to one side of the bookcase and finishing around to the other side.
- Right handed people are best wallpapering clockwise around the room (as shown) because you tend to trim the paper from left to right i.e. from the edge of the last hung length across the one you have just hung. Left handed people may therefore find it easier to go anti-clockwise, as you will normally trim right to left.
- Please check out my guide – ‘Wallpapering a room’ which shows a photographic step-by-step sequence of working your way around a room.
- Much more information about centralizing a pattern, is shown in my guide ‘How to wallpaper a chimney breast’, and contains a few more detailed points on where to start wallpapering.

Hi Julian,
I’ve enjoyed reading some of your hints pages just recently. Regarding wallpapering, I was taught many years ago it’s best to paper away from a light source (like a window) but you don’t mention anything like that. Is my info a falacy? I’ve always used it and it does seem to mask joins to some extent. Would be glad of your input.
Regards
James
Hi James,
Thank you for your comment.
I must admit that papering away from a light source is not a technique that I’m aware of for improving joins. My best tips for joins are taking time to make a precise butt join top to bottom, ensuring the pattern match is exact at eye level, and making sure that clean water is used when sponging down the paper to remove any paste residue.
That said, if papering away from the light source works for you, then I’d keep going with your method!
Best
Julian
I can’t seem to find an answer as where to start a feature wall with a fireplace that is NOT central.
Would appreciate a little help here please?
Hi Mondo,
Apologies for incredibly late reply.
I’d always centralise the pattern on the chimney breast – for more information on this see my guide – “How to wallpaper a chimney breast” – the link is in the ‘Related Posts’ section above.
Hope this helps,
Best
Julian