Top 10 uses for masking tape

Standard, humble, masking tape………..just so many uses.
My top 10 uses for masking tape does include some ‘masking up’ to divide different painted surfaces, but not as many as you may think. Don’t get me wrong, masking tape is useful for defining precise paint edges, in some situations, but most of the time you are far better off painting edges without the aid of tape. Yes it is true that if you use top quality (and expensive) masking tape, and combine it with pin point perfect technique in application, you can get a good finish, but to be honest, in most situations you really don’t need it.
However, my aim to make people cut down on masking tape use in the situations described above shouldn’t worry manufacturers, as I still use tonnes of the stuff for many, many other jobs. My top 10 uses below are the areas I use masking tape most. And before you ask which type? I’m talking about the standard buff-coloured masking tapes rolls, nothing pricey, nothing coloured, nothing low tack, not the really cheap stuff, but the next grade up…..just standard, ‘classic’ masking tape.
1. Sealing around a bath

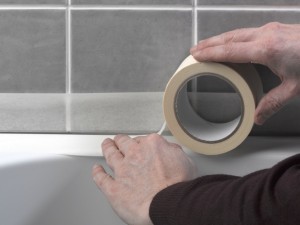
Using masking tape before applying siliconce sealant – it’s essential.
You can’t do this job without masking tape. This is where you apply a bead of silicone sealant around the junction between the bath and tiles in your home (or shower for that matter, or in fact any junction where this water tight seal is needed). Because you’re taping onto very flat surfaces, you can be crisp and accurate with your lines, and there is little danger of any sealant bleeding under the edge of the tape, as long as you apply it carefully. Applying silicone sealant is tricky enough as it is, and without masking tape, nigh on impossible. Much more about the technique in my ‘Tiling walls’ guide.
2. Labelling cans
When doing any DIY job, I’m constantly ripping off label-sized sections of masking tape and sticking them on all sorts of tools and materials for future reference. I always label paint cans with the date I used the paint, what colour, and where. Slightly over the top you may think, but in a storage area full of cans (and it doesn’t need to be many), when you come back to them in six months time and need the correct emulsion to repaint a wall that your son has just managed to spray a can of Coke over, you will stand there, scratching your head thinking was it ‘Snow white’ or ‘Ice white’? Okay, not vital if the wall is fluorescent purple, as you’re not likely to have too many of ‘them’, but if you’ve used different whites, or say cream emulsions in your home, in that moment you stare at the cans, you always end up guessing. Simply stick a label on them – much easier.
3. Labelling paint brushes
Okay, I’m a bit compulsive here, but I also label brushes for different paints. This is most useful if you use a lot of brushes, or when storing them in devices such as Brush Mates  (if you don’t know what these are, see my ‘Top 10 of DIY guide’, point 7.). If you use a lot of white gloss, maybe off-white gloss, and a bit of white eggshell, trust me, when you look in your Brush Mate, see a few suspended brushes, you can rarely remember exactly which is which by just looking. Just label them, then there’s never a problem.
4. Support as adhesive goes off

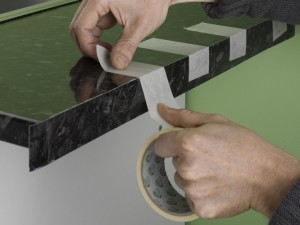
Using masking tape to hold an edging strip in place whilst the adhesive, between the strip and the worktop edge, dries.
For supporting two or more things whilst adhesive dries is a great use for masking tape. For example, if you’re sticking the edging strips on the cut ends of a laminate worktop, the tape holds it securely in place whilst the adhesive does its stuff. Simply remove the masking tape, once the adhesive is dry.
5. Wrapping up fixings and hooks
When you clear a room for decoration, you take down curtain poles, wall cupboards, remove cupboard handles and many other fittings and fixtures that have all sorts of little screws and brackets. Trust me, if you separate the little bits from the big bits, the little bits have invariably gone ‘missing’ when you come to put the room back together, or alternatively you have all the screws but can’t remember which little pile of screws goes with which object. Therefore I always tape all the bits of each item together. Okay, a bit of clarification. For example, with curtain poles, tape the screws to the brackets and the brackets to the poles. With wall cupboards, tape any fixings or brackets inside the cupboard, and tape the door shut for that matter – there are many bathroom cabinets across the world that have been picked up to be re-positioned, after decorating, and the door has swung open and cracked – easily done, but always avoidable. One word of caution, tape adhesive can sometimes damage decorative surfaces, so use common sense for the more delicate objects.
6. Drill bit hole depth
When you drill into a wall and need to be accurate on the depth you are drilling, simply measure off the required depth on the drill bit, and wrap a piece of masking tape around it at this point. Drill into the surface, and stop when you get to the tape. Couldn’t be easier, and much better than guessing depth, or constantly checking, or using one of those clamped on drill depth gauges you see available with some drills – another unnecessary gadget in my view, for most situations anyway.
7. Cut protection

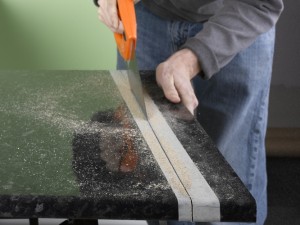
Taping along the cutting line to help prevent damaging the laminated finish.
No, I’m not suggesting use as a form of plaster, but rather with certain laminated boards, if you tape the line where you are going to cut with a saw, the tape helps to prevent the blade slipping, and helps stop the laminate surface chipping as the saw cuts through.
8. Masking up carpet
If you have to leave the carpet down when painting a room, then masking tape is essential to stop paint getting on the carpet when you paint the skirting board and trim. However, you do need to be extremely careful when laying the tape down to make sure there is no gap between the skirting board and tape, where paint can easily seep through. As you lay a length of tape out, initially overlap the edge closest to the skirting board, slightly up the skirting board face (loosely so it doesn’t stick). Then use a wide blade scraper to push the edge of the tape down between the skirting board and carpet edge. You can literally compress the edge of the carpet down so that the tape edge gets right down to sub-floor level, making a leak proof barrier. You do need a bit of practice with this, and you need to take care not to split or rip the paper with the edge of the scraper blade, so it is best to do a bit of experimention with your technique before you put all your trust in a strip of masking tape protecting your carpet edges.
9. Dust sheets and masking tape
Once skirting has been masked as described above, in some instances I also tape dust sheets (the cotton twill type) to the edge of the masking tape ‘border’ around the edge of the room. Also, I will always use the lightweight plastic sheets to cover large pieces of furniture, as they are cheap, impermeable to dust and therefore paint overspray, and you can also see what has been covered at a glance. I always tape them in place, because I once got bored of repositioning them every time someone opened the door, window, or anything else that creates the slightest draught!
10. Masking the top of skirting board
One of the only areas I use masking tape to make a paint-to-paint-edge dividing line is when you are painting the walls and ceilings in a room, but not the woodwork and trim. However, the reason I do this is more to do with protecting the skirting board from paint roller overspray, than for helping me create a precise dividing line. You still apply the tape accurately along the precise junction between the walls and skirting board for example, but once the wall painting is finished and you remove the tape, you should still go back and straighten up any areas along the edge by hand, if required.
The above selection is without doubt where I have used hundreds, if not thousands, of rolls of masking tape over the years – there are other jobs I use it for, but these must be the top 10 uses for masking tape in my career. As mentioned at the start of this post, there is nothing written above about taping between walls and ceilings, or door architraves and walls, because in 99% of cases it is just completely unnecessary in my view. Why? a subject for another post I think, as I feel a bit of a rant coming on, and I want to give some in depth analysis!…………… and this post has gone on quite long enough already!
