Lining walls
Lining walls prior to painting or wallpapering them is a subject that can stir up a bit of controversy with many decorators as well as DIY enthusiasts. For issues about why to use lining paper in the first place, check out my guide ‘Using lining paper’, but in this guide, I want to concentrate on some simple application rules as well as the reasons for cross lining, where the lining paper is hung horizontally, and vertical lining, where the paper is hung ceiling to floor, just like wallpaper.
Surface preparation
All wall surfaces must be filled and sanded to create as smooth a surface as possible before lining. Also walls must be ‘sized’ prior to lining. Size, is basically a dilute wallpaper paste, and if you read the back of any wallpaper paste sachet box, it will give you the correct dilution for mixing up size. The size basically seals the surface, making it more even in terms of absorbency. It also prevents the paste on your lining paper being sucked straight into the surface and, crucially, provides a slightly slippery surface when you apply your lining paper, making it much easier to slide into position.
As an alternative to size, I often use PVA that has been diluted 5 parts water to one part PVA. It dries much more quickly than size, and does the same job. Whichever option you choose, the size/pva must be allowed to dry before hanging your lining paper.
Soaking times and paste strength
All lining paper (except the paste-the-back varieties), needs to soak for a few minutes after pasting and before applying to the wall. This soaking time (sometimes called booking time), allows the paper to expand slightly before application. It is important to be as consistent as possible with soaking times, as variations between adjacent lengths on the wall, can lead to seams splitting open, or overlaps appearing, once the paper dries. Soaking time will vary between different grades of paper – 1000 lining paper will typically be five minutes, but always read the manufacturer’s specific recommendations.
One further issue relating to the paste you use is that if you are going to be wallpapering after lining, you should always use the same type, and strength, of paste for the lining paper, as you will use for the wallpaper.
Cross lining or vertical lining?

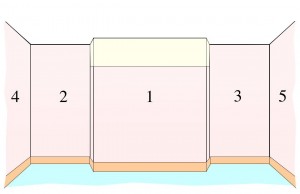
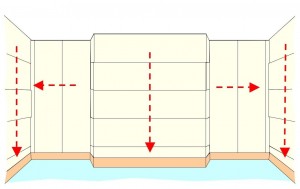
Walls are treated as separate ‘objects’, numbered 1-5 in this example. Chimney breasts provide an exception to the rule, as you can normally bend the paper around the corner onto the narrower walls either side. If you do get small gaps between lengths, they can still be filled, and sanded.

Very simply, the wide walls are cross lined and the narrow walls are lined vertically. I always start at the top and work down with cross lining, although there’s nothing stopping you working from the skirting board upwards.
The technique that I have always used is basically very simple. I always treat each wall in a room as a separate ‘object’, and whether I paper horizontally or vertically, is dependent on which direction will provide the fewest number of joins.
The fewer the joins, effectively means the fewer lengths of paper you need to hang, which means the quicker the job. Therefore in most instances, walls which are wider than they are taller, will always get cross lined, which in fact means most walls, in most homes! The only walls that get vertically lined are narrow alcoves.
Some decorators will argue about the necessity of cross lining every wall, because of the risk of coinciding seams with the wallpaper, which is an irrelevant argument, in my opinion (see my guide – ‘Using lining paper’).
Others raise a point, not dissimilar to the reasons for how ply is constructed (yes the wooden sheets). Ply is made up of different layers of wood, with each layer being at right angles to the previous one. In other words the various tensions and stresses of each layer trying to expand or contract, depending on atmospheric conditions, is opposed by the adjacent layer. This therefore makes a very stable product that shouldn’t effectively, go out of shape. In terms of wallpaper, the argument is that you should create this same system, with the lining paper being hung horizontally, and the wallpaper vertically. Well personally, I don’t really buy into this argument, certainly with modern wallpapers, but if you have a specialist paper that insists on cross lining all walls, then I’d follow their suggestion, as after all, if something goes wrong, you know you have followed the manufacturer’s guidelines to the letter.
Whether you cross line, or line vertically, always trim into every internal corner, making sure there is no overlap of paper onto the adjacent wall. In many cases this may leave a small gap, but fear not, as all you do, once the lining is complete (and dry), is run a thin bead of decorator’s caulk along every internal corner in the room, also along the ceiling wall junction, and along wall/skirting/architrave junctions. This creates a perfect smooth joint in all cases, as well as sticking down every edge of the lining paper, making it nearly impossible for the paper edges to ‘lift’, at a later date.
Butt joining or leaving gaps?
Another question that seems to crop up is whether you should leave gaps between lining paper lengths, rather than butt join them like wallpaper. Personally, I’ve never left gaps, and always butt join lengths whether hanging horizontally or vertically. If you are a beginner, and are struggling to butt join a particular length for some reason, it is better to have a small gap, rather than an overlap, as you can fill the gap with some filler once the paper is dry and carefully sand it back smooth – with an overlap, disguising it, is much more difficult.
Summing up
- Remember to size before lining.
- Use the same type/strength of paste for the lining paper, and wallpaper.
- In general, hang lining paper horizontally. It may seem more difficult initially as you have to hold the length in one hand whilst positioning, and smoothing it out with the other, but trust me, once you’ve got the hang of it, it’s as easy as as hanging vertically.
- Always caulk the joints along the junctions.
- Read both the lining paper instructions, and wallpaper hanging instructions before you begin. Following them to the letter ensures you have a guarantee if any problems occur.
